

A practical, engineering-first reference for identifying the root cause of silver streaking, diagnosing it systematically on the shop floor, and eliminating it through material handling, process control, and mold design corrections.
Silver streaks are among the most frequently reported cosmetic defects in plastic injection molding, and also among the most misdiagnosed. A part that looks fine off the press one shift can start streaking the next, and the instinctive fix — turning up the barrel temperature or slowing the screw — often makes the defect worse rather than better. That is because silver streaking is rarely caused by a single variable. It sits at the intersection of material condition, machine process settings, and mold design, which means an effective fix depends on correctly identifying which of those three domains is actually responsible before any parameter is changed.
For engineering and procurement teams evaluating a molder’s quality process, the ability to reliably trace a silver streak complaint back to its true root cause — rather than cycling through unrelated parameter changes until the defect happens to disappear — is one of the clearer indicators of process maturity. A shop with disciplined moisture verification, documented process windows per resin, and a structured mold maintenance schedule will typically resolve a chronic streaking issue in a single diagnostic cycle. A shop without those controls in place often ends up chasing the symptom indefinitely, burning both material and press time without ever addressing the underlying cause.
This guide walks through what silver streaks are, how they differ from visually similar defects like splay marks and flow lines, the material- and process-related root causes, the mold design factors that make streaking more or less likely, and a systematic troubleshooting sequence that molders and product engineers can apply directly on the production floor.
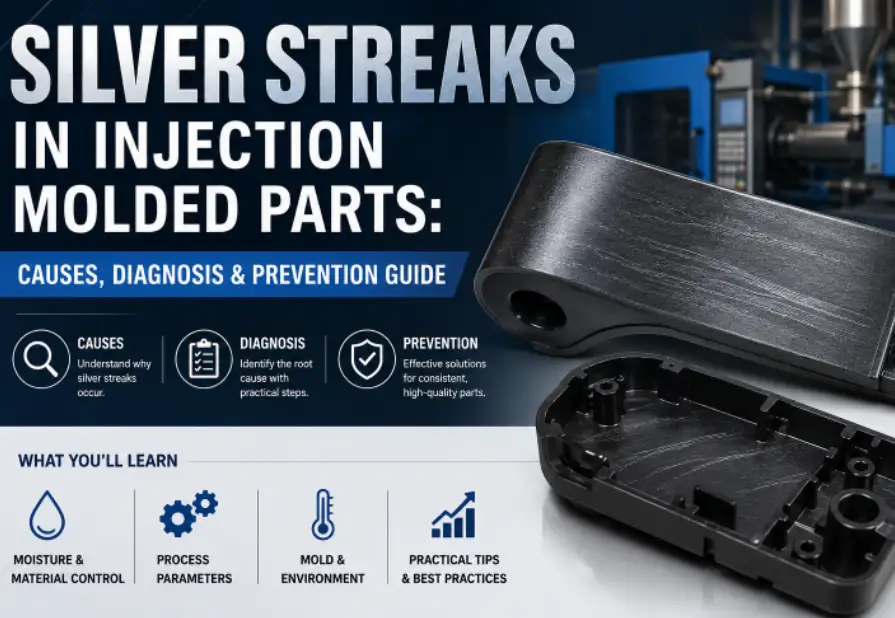
What Are Silver Streaks in Injection Molding?
Silver streaks — sometimes called splay, silver streaking, or moisture streaking — are elongated, silvery-white or metallic-looking surface marks that run in the direction of melt flow on an injection-molded part. They are visually distinct from a uniform matte or glossy surface finish and are typically most visible on darker resin colors, where the contrast between the streak and the base color is highest.
The streaking effect occurs when gas — most commonly water vapor, but sometimes volatile additives or degraded resin byproducts — becomes trapped in the melt stream and is stretched into elongated bubbles or voids as the material flows through the gate and into the cavity. When these micro-voids reach the cavity surface and rupture or flatten under injection pressure, they leave behind a streaked, frosted appearance that follows the flow pattern of the part rather than appearing as isolated pinholes or random blemishes.
Silver Streak Defect Snapshot
| Characteristic | Typical Appearance |
|---|---|
| Visual pattern | Elongated silvery or frosted streaks running parallel to melt flow direction |
| Most visible on | Darker resin colors (black, navy, charcoal) and glossy surface finishes |
| Typical location | Near the gate, along rib intersections, and at the last-fill region of the cavity |
| Primary root cause category | Trapped gas — usually moisture vapor, occasionally degraded resin or additive volatiles |
| Affected resin families | Hygroscopic engineering resins (nylon/PA, PC, ABS, PBT) most commonly; any resin can streak under severe conditions |
| Primary correction domains | Material drying, screw/barrel process settings, mold venting design |
What Causes Silver Streaks in Injection Molded Parts?
Silver streaks originate from one of four general mechanisms, and it is common for more than one to be present simultaneously on a chronically streaking part. Understanding which mechanism is active is the difference between a five-minute fix and a week of trial-and-error process adjustments. It is worth emphasizing at the outset that these four mechanisms are not mutually exclusive on a given production run — under-dried resin processed at excessive screw speed will generate both moisture-driven and shear-driven gas simultaneously, and the resulting streak pattern can be more severe and harder to isolate than either cause would produce on its own.
This is precisely why an isolation trial that controls for material condition while holding process settings constant, described further below, is so much more efficient than adjusting multiple variables at the same time on the production floor.
1. Moisture in the Resin (Hydrolysis and Vapor Entrapment)
This is by far the most common cause. Hygroscopic resins such as nylon (PA6, PA66), polycarbonate, ABS, PBT, and TPU absorb ambient moisture from the air during storage and handling. When under-dried pellets are melted in the barrel, that absorbed moisture flashes into steam at processing temperatures well above the boiling point of water. The steam becomes entrained in the melt stream, is drawn out and elongated as the material shears through the screw and gate, and appears at the surface as a classic silver streak. In resins prone to hydrolytic degradation — nylon and PC in particular — excess moisture also chemically breaks polymer chains during processing, compounding the surface defect with a genuine loss of mechanical properties.
2. Shear Degradation and Localized Overheating
Excessive shear heat generated by high screw speed, high back pressure, or oversized screw compression ratios can locally overheat and degrade the resin inside the barrel, well above the melt temperature indicated on the machine display. Degraded resin releases volatile gases — monomers, degradation byproducts, and off-gassing additives — that behave the same way as moisture vapor once entrained in the flow front.
3. Entrapped Air from Inadequate Venting
Air that is not fully displaced ahead of the advancing melt front can become compressed and driven into the melt stream itself, particularly at flow fronts that meet, split around a core, or encounter an undersized or poorly located vent. Unlike moisture-related streaking, air-entrapment streaking tends to concentrate at specific, repeatable locations tied to the part geometry and gate layout rather than appearing broadly across the part.
4. Regrind Contamination and Additive Incompatibility
Regrind that has been processed multiple times, contaminated with foreign resin, or stored without moisture protection reintroduces both degraded polymer and absorbed moisture into the virgin material stream. Similarly, some colorants, flame retardants, and mold release agents volatilize at standard processing temperatures and produce streaking independent of moisture content.
Tip: Isolate the Cause Before Changing Process Parameters. Before adjusting a single machine setting, run a controlled test: mold a short shot series using freshly dried virgin resin, at the resin supplier’s recommended melt temperature and screw speed, on a mold with all vents cleaned and confirmed open. If streaking disappears, the root cause was material-related (moisture or contaminated regrind) rather than process or mold-related. If streaking persists under these controlled conditions, the problem sits in either the screw/barrel process settings or the mold venting design, and further trial-and-error changes to drying time alone will not resolve it. This single diagnostic shot — often called an isolation trial — typically takes under an hour and saves days of unproductive parameter chasing. Document the shot with photos and a batch record so the finding can be referenced if the defect reappears on a later production run.
Silver Streaks vs. Splay Marks vs. Flow Lines: How to Tell Them Apart
Because several injection molding surface defects produce a visually similar streaked or lined appearance, correctly distinguishing silver streaks from flow lines, weld lines, and delamination is the first practical diagnostic step. Misidentifying the defect leads directly to the wrong corrective action.
Distinguishing Silver Streaks From Similar Surface Defects
| Defect | Visual Signature | Root Cause | Typical Fix Direction |
|---|---|---|---|
| Silver streaks/splay | Elongated silvery, frosted marks following flow direction | Trapped gas (moisture, degradation byproducts, entrapped air) | Drying, process temperature/shear control, venting |
| Flow lines | Faint wavy rings or bands, often near the gate, same gloss level as surrounding surface | Uneven cooling rate as melt front advances | Melt/mold temperature balance, gate location, injection speed profile |
| Weld lines | Fine visible line where two flow fronts meet; may show reduced strength | Melt fronts converge at a temperature too low to fully fuse | Increase melt/mold temperature, relocate gate, add overflow well |
| Delamination | Layered, flaky surface that can be peeled with a fingernail | Material contamination or incompatible regrind blend | Eliminate contamination source, verify resin compatibility |
| Diesel/burn marks | Dark, scorched marks, usually at last-fill locations | Trapped air ignited under adiabatic compression | Add or clean vents, reduce injection speed at end of fill |
A quick field test for distinguishing silver streaks from flow lines is gloss comparison: silver streaks show a visibly different — usually duller or more frosted — surface texture than the surrounding part, while flow lines typically retain the same gloss level as the rest of the surface and are visible mainly as a subtle contour change under raking light. A second useful check is cross-sectioning a rejected part through the streaked region: silver streaks typically reveal elongated micro-voids just beneath the surface under magnification, whereas flow lines and weld lines show no corresponding internal void structure, since their cause is thermal and cosmetic rather than gas-related. This distinction matters most when a defect is borderline between categories, since a mold design correction aimed at fixing a flow line — such as raising mold temperature — will do little to resolve a true gas-related silver streak and can waste a full trial cycle before the misdiagnosis is caught.
Material-Related Root Causes: Moisture Content and Drying Requirements
Resin drying is the single highest-leverage correction for the majority of silver streak complaints, because most streaking parts are molded from hygroscopic resins that were under-dried, dried at the wrong temperature, or exposed to ambient humidity after drying and before the hopper. Different resin families require substantially different drying temperatures, dew points, and residence times, and using a generic drying schedule across multiple materials is one of the most common root causes of chronic streaking in multi-material molding operations.
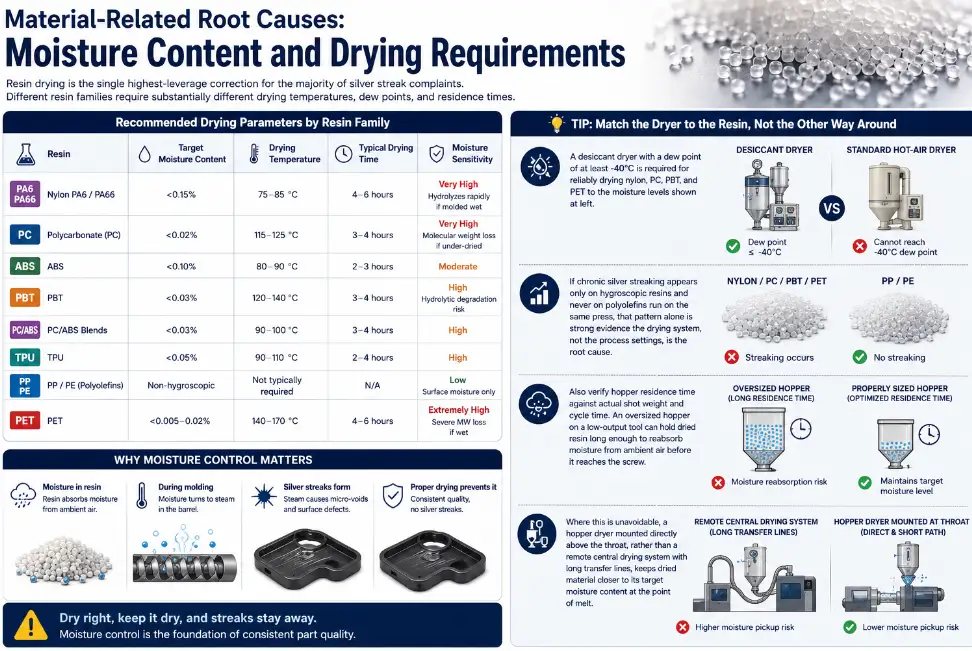
Recommended Drying Parameters by Resin Family
| Resin | Target Moisture Content | Drying Temperature | Typical Drying Time | Moisture Sensitivity |
|---|---|---|---|---|
| Nylon PA6 / PA66 | <0.15% | 75–85 °C | 4–6 hours | Very high — hydrolyzes rapidly if molded wet |
| Polycarbonate (PC) | <0.02% | 115–125 °C | 3–4 hours | Very high — molecular weight loss if under-dried |
| ABS | <0.10% | 80–90 °C | 2–3 hours | Moderate |
| PBT | <0.03% | 120–140 °C | 3–4 hours | High — hydrolytic degradation risk |
| PC/ABS blends | <0.03% | 90–100 °C | 3–4 hours | High |
| TPU | <0.05% | 90–110 °C | 2–4 hours | High |
| PP / PE (polyolefins) | Non-hygroscopic | Not typically required | N/A | Low — surface moisture only |
| PET | <0.005–0.02% | 140–170 °C | 4–6 hours | Extremely high — severe MW loss if wet |
Tip: Match the Dryer to the Resin, Not the Other Way Around. A desiccant dryer with a dew point of at least -40°C is required for reliably drying nylon, PC, PBT, and PET to the moisture levels shown above — a standard hot-air dryer cannot reach these dew points and will leave hygroscopic resins persistently under-dried regardless of how long the material sits in the hopper. If chronic silver streaking appears only on hygroscopic resins and never on polyolefins run on the same press, that pattern alone is strong evidence the drying system, not the process settings, is the root cause. Also verify hopper residence time against actual shot weight and cycle time: an oversized hopper on a low-output tool can hold dried resin long enough to reabsorb moisture from ambient air before it reaches the screw, especially in humid regions or during seasonal humidity swings. Where this is unavoidable, a hopper dryer mounted directly above the throat, rather than a remote central drying system with long transfer lines, keeps dried material closer to its target moisture content at the point of melt.
Machine and Process-Related Causes of Silver Streaks
Even with correctly dried material, process settings that generate excess shear heat or fail to purge trapped gas ahead of injection will produce streaking. The most common process-related contributors are excessive back pressure, high screw rotation speed, elevated barrel zone temperatures (particularly at the nozzle), and prolonged residence time in the barrel during production interruptions.
Process Parameters and Their Effect on Streak Formation
| Process Parameter | Effect When Set Too High | Corrective Direction |
|---|---|---|
| Back pressure | Increases shear heat, promotes gas entrainment in the melt | Reduce to lowest setting that maintains consistent melt homogeneity, typically 50–150 psi hydraulic |
| Screw rotational speed | Localized frictional overheating, especially at the compression zone | Reduce RPM so screw recovery finishes just before mold opens, avoiding idle high-shear dwell |
| Nozzle/front zone temperature | Promotes degradation of heat-sensitive resins near the gate | Set within resin supplier’s recommended processing window; avoid “just in case” overshoot |
| Barrel residence time | Prolonged exposure to heat degrades resin during slow cycles or interruptions | Match barrel/shot size to the part so residence time stays under 3–5x the shot’s melt time |
| Injection speed (fast-fill zones) | Shear-heats melt at the gate, can flash trapped moisture instantly | Use a multi-stage velocity profile that slows fill near vents and thin sections |
Tip: Right-Size the Barrel to the Shot. A barrel and screw that are significantly oversized for the part being molded is a frequently overlooked cause of chronic streaking, because a small shot sitting in a large barrel spends far more time exposed to barrel heat than the resin manufacturer’s recommended residence time allows. As a rule of thumb, the shot weight should occupy at least 30–50% of the barrel’s rated shot capacity; running consistently below that range increases the risk of thermal degradation and gas generation regardless of how carefully the temperature profile is tuned. If moving the job to a better-matched machine isn’t immediately practical, reducing cushion size, minimizing unnecessary hold time, and lowering rear-zone barrel temperatures can partially offset the residence time problem. This is also why the same tool can run clean on one press and streak consistently on another — the barrel-to-shot ratio, not just the temperature setpoints, needs to be checked whenever a mold is moved between machines.
Mold Design Factors That Contribute to Silver Streaking
Material and process corrections resolve the majority of silver streak complaints, but a meaningful subset of chronic cases trace back to the mold itself — specifically inadequate venting, gate location and sizing, and runner system design that concentrates shear heat right before the melt enters the cavity.
Venting Design
Vents that are too shallow, too few, or positioned away from the actual last-fill location of the cavity will trap air ahead of the flow front. As fill speed increases to compensate for other process issues, this trapped air is compressed and driven back into the melt stream, contributing to streaking that is indistinguishable at a glance from moisture-related streaking but will not respond to any amount of additional resin drying.
Gate Location, Type, and Size
An undersized gate increases local shear rate dramatically as melt is forced through a restricted opening, generating localized overheating right at the point of cavity entry — often the exact location where streaking first appears on a part. Gate location relative to wall thickness transitions and rib intersections also determines whether flow fronts converge cleanly or trap air at those junctions.
Runner and Cold Slug Well Design
Runners with excessive length, undersized diameter, or sharp transitions increase shear heat and pressure drop before the melt even reaches the gate. A missing or undersized cold slug well at runner intersections allows the cooler, partially degraded leading edge of the melt stream to be pushed directly into the cavity rather than trapped and left behind in the runner.
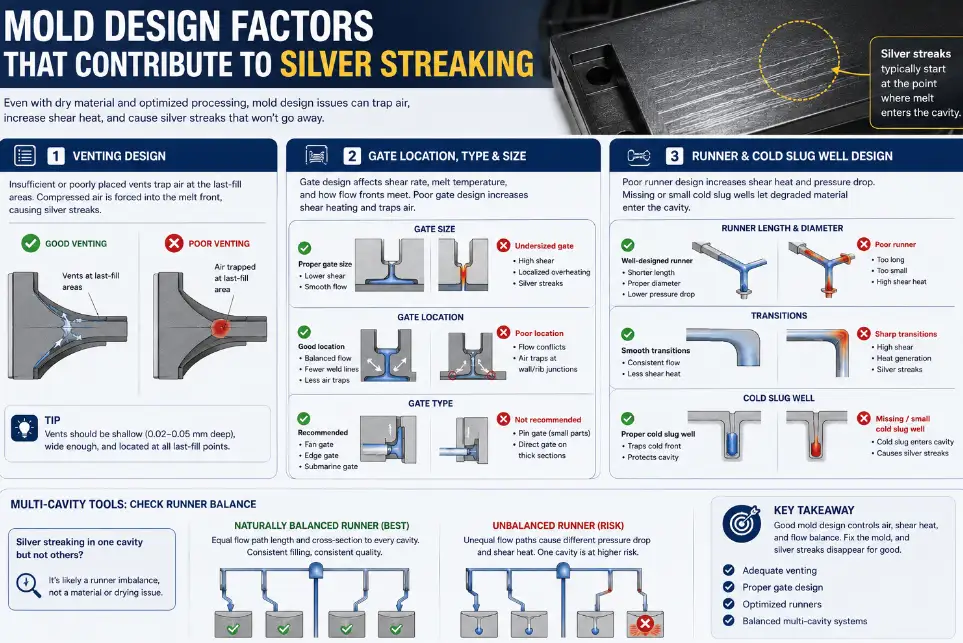
Multi-cavity tools introduce an additional variable worth checking specifically: runner imbalance between cavities. If one cavity in a family mold consistently streaks while the others run clean using identical material and process settings, the cause is very unlikely to be moisture, since every cavity is fed from the same barrel and hopper. Instead, this pattern points strongly toward an unbalanced runner system forcing that cavity to fill through a longer or more restrictive flow path, generating localized shear heat that the other cavities do not experience. Naturally balanced runner layouts — where every flow path from sprue to gate is geometrically identical in length and cross-section — eliminate this failure mode by design, whereas artificially balanced systems that rely on adjusted gate sizes to compensate for unequal runner lengths are more prone to drifting out of balance as the tool wears.
Mold Design Checks for Silver Streak Prevention
| Mold Element | Common Deficiency | Design Correction |
|---|---|---|
| Parting line vents | Vent depth too shallow or vents not positioned at true last-fill location | 0.02–0.05 mm depth (material-dependent), placed per mold flow simulation last-fill mapping |
| Ejector pin vents | No venting through ejector pin clearances in deep, isolated pockets | Add controlled clearance venting at pins in trapped regions |
| Gate size | Undersized gate relative to wall thickness and shot volume | Size gate to part wall thickness per resin supplier guidelines, typically 50–100% of nominal wall |
| Runner diameter | Undersized or excessively long runner run | Balance runner diameter and length to minimize shear and pressure drop |
| Cold slug well | Missing or undersized at runner-gate intersections | Add a well sized to capture the cooled leading edge of each shot |
Tip: Use Mold Flow Simulation to Confirm True Last-Fill Locations. Vents are frequently placed at the geometric edge of a cavity based on intuition rather than actual fill behavior, which means they may not be located where air is truly being trapped. Injection molding simulation software identifies the true last-fill point and any secondary air trap locations created by flow fronts meeting around cores, ribs, or bosses — information that is very difficult to predict by eye on anything but the simplest part geometry. Before cutting additional vents into an existing tool, run a short-shot fill study on the physical mold: reduce the shot size in 5–10% increments and photograph each partial fill to map exactly where the flow front is last to arrive. This mirrors what simulation predicts and confirms the actual, as-built vent locations against the theoretical model, since machining tolerances and mold wear can shift last-fill behavior away from the original design intent over the life of the tool.
Where Streaks Appear on the Part: What Location Tells You
The physical location of a silver streak on a finished part is itself diagnostic information, and experienced process engineers often form an initial hypothesis about root cause before running a single test simply by mapping where on the part the defect consistently occurs.
Streak Location Patterns and What They Typically Indicate
| Streak Location | Likely Indication |
|---|---|
| Concentrated at or immediately around the gate | Gate undersized relative to wall thickness, generating localized shear heat at cavity entry |
| Distributed broadly across the entire part surface | Material moisture content — the defect is present in the melt stream from the start of fill |
| Confined to one cavity in a multi-cavity family mold | Runner imbalance forcing that cavity through a longer or more restrictive flow path |
| Along rib intersections or where flow fronts converge around a boss or core | Entrapped air at a weld/meld point rather than moisture |
| Only at the last-fill region, farthest from the gate | Inadequate or missing vents at that specific location |
| Appears only during first shots after a changeover or long idle period | Barrel purge or startup residence time issue rather than a steady-state process problem |
This location-based reasoning is not a substitute for the diagnostic sequence outlined below, but it is a fast and useful way to prioritize which branch of that sequence to start with, particularly when press time is limited and a full isolation trial cannot be scheduled immediately.
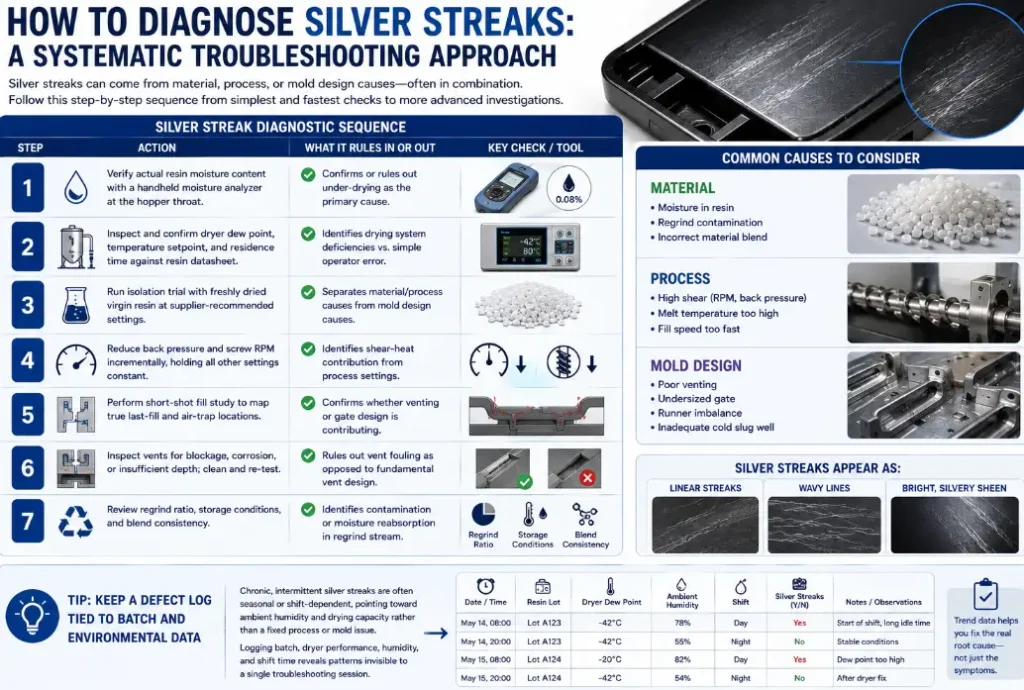
How to Diagnose Silver Streaks: A Systematic Troubleshooting Approach
Because silver streaks can originate from material, process, or mold design causes — often in combination — an effective troubleshooting sequence works through the lowest-cost, fastest-to-test variables first before escalating to mold modifications.
Silver Streak Diagnostic Sequence
| Step | Action | What It Rules In or Out |
|---|---|---|
| 1 | Verify actual resin moisture content with a handheld moisture analyzer at the hopper throat | Confirms or rules out under-drying as the primary cause |
| 2 | Inspect and confirm dryer dew point, temperature setpoint, and residence time against resin datasheet | Identifies drying system deficiencies vs. simple operator error |
| 3 | Run isolation trial with freshly dried virgin resin at supplier-recommended settings | Separates material/process causes from mold design causes |
| 4 | Reduce back pressure and screw RPM incrementally, holding all other settings constant | Identifies shear-heat contribution from process settings |
| 5 | Perform short-shot fill study to map true last-fill and air-trap locations | Confirms whether venting or gate design is contributing |
| 6 | Inspect vents for blockage, corrosion, or insufficient depth; clean and re-test | Rules out vent fouling as opposed to fundamental vent design |
| 7 | Review regrind ratio, storage conditions, and blend consistency | Identifies contamination or moisture reabsorption in regrind stream |
Tip: Keep a Defect Log Tied to Batch and Environmental Data. Chronic, intermittent silver streaking is often seasonal or shift-dependent, which is a strong clue pointing toward ambient humidity and drying system capacity rather than a fixed process or mold issue. Logging streak occurrences against resin lot number, dryer performance data, ambient shop humidity, and shift start time frequently reveals a pattern invisible to any single troubleshooting session — for example, streaking that consistently appears during the first hour of a shift after a long changeover, when hopper material has had extended idle time to reabsorb moisture from ambient air. This kind of trend data also protects against the common trap of “fixing” a problem that was actually about to resolve itself, since humidity-driven streaking can appear to respond to an unrelated process change simply because conditions changed at the same time. A simple spreadsheet log maintained by quality or process engineering, cross-referenced monthly, is usually sufficient to surface these correlations without dedicated statistical software.
Silver Streaks by Resin Type: Sensitivity and Special Considerations
Not all resins are equally prone to silver streaking, and the mechanism differs meaningfully between resin families. Understanding resin-specific sensitivity helps set realistic drying and process tolerances rather than applying a one-size-fits-all standard across a multi-material production floor. Molders that run a rotating mix of resins across the same press fleet are particularly exposed to this variability, since a drying and process standard tuned for a moderately sensitive resin like ABS may be dangerously insufficient the moment the same press is scheduled to run polycarbonate the following week, unless dryer setpoints and moisture verification are re-checked at every material changeover rather than left at whatever the previous job required.
Silver Streak Sensitivity by Resin Family
| Resin | Streak Sensitivity | Dominant Mechanism | Special Notes |
|---|---|---|---|
| Nylon (PA6/PA66) | Very High | Moisture vapor + hydrolytic chain scission | Streaking often accompanied by measurable loss of impact strength if molded wet |
| Polycarbonate | Very High | Moisture vapor + hydrolysis | Requires the tightest moisture control of common engineering resins |
| ABS | Moderate–High | Moisture vapor + shear degradation | Regrind ratio is a common secondary contributor |
| PBT | High | Moisture vapor + hydrolysis | Glass-filled grades additionally sensitive to fiber-related shear heat |
| Polypropylene | Low | Surface moisture, entrapped air, or additive volatiles | Streaking usually points to venting or additive issues rather than drying |
| POM (acetal) | Moderate | Thermal degradation (formaldehyde off-gassing) under overheating | Narrow processing window; overheating risk is more critical than moisture |
| TPU | High | Moisture vapor | Highly hygroscopic; requires disciplined drying discipline similar to nylon |
Tip: Treat Non-Hygroscopic Resins as a Different Diagnostic Path Entirely. When silver streaking appears on a resin that is not meaningfully hygroscopic, such as polypropylene or polyethylene, resist the instinct to extend drying time as a first response — surface moisture on pellets from condensation during humid weather can contribute, but the more probable causes are entrapped air from inadequate venting, volatilizing additives such as certain mold release agents or flame retardants, or shear-related degradation from an oversized or poorly matched screw. Confirm the resin’s actual moisture absorption specification on its datasheet before allocating drying capacity to a material that doesn’t need it, since running an unnecessary drying cycle wastes energy and hopper throughput without addressing the real cause. For polyolefins specifically, a short-shot fill study to check for air-trap locations is usually a more productive first diagnostic step than any adjustment to material handling.
Silver Streak Prevention: A Best-Practices Checklist
Preventing silver streaks reliably across a production run — rather than fixing a single occurrence — requires standardizing the material handling, process control, and mold maintenance practices covered above into a repeatable checklist that operators and process engineers can apply consistently.
Silver Streak Prevention Checklist
| Category | Preventive Action | Frequency |
|---|---|---|
| Material | Verify resin moisture content at hopper before each production run | Every job changeover |
| Material | Confirm dryer dew point and temperature against resin datasheet | Daily / shift start |
| Material | Limit exposed-to-air time between drying and molding | Continuous — target under 15–30 minutes for high-sensitivity resins |
| Process | Review back pressure and screw RPM against resin supplier processing guide | Job setup/process validation |
| Process | Monitor and cap barrel residence time relative to shot size | Job setup and after any machine change |
| Mold | Inspect and clean vents for buildup, corrosion, or blockage | Preventive maintenance schedule |
| Mold | Confirm gate and runner sizing against current part/resin combination | At tool design review and after any resin change |
| Quality | Maintain defect log cross-referenced to batch, shift, and humidity data | Continuous |
Manufacturers running high-mix production across multiple hygroscopic engineering resins generally find the greatest return from investing in centralized, dew-point-monitored drying systems with individual hopper controls, since inconsistent drying across jobs is the single most common recurring source of silver streak complaints reported by molders and product engineers alike. At AIM Plastic, this standardized approach to resin drying and vent maintenance is applied as a baseline production control on every hygroscopic-resin program, rather than as a reactive response once streaking has already appeared on finished parts.
The checklist above is deliberately organized by category rather than by urgency, because the categories map directly to who on a production floor is responsible for each control point. Material handling items typically fall to material handlers and setup technicians; process parameter reviews belong with process engineering; mold inspection and vent maintenance sit with the toolroom; and defect logging is a shared responsibility between quality and production.
Assigning clear ownership for each line item, rather than treating silver streak prevention as a single undifferentiated “quality” task, is what actually makes a checklist like this hold up over months of production rather than lapsing after the initial corrective action closes out. Many molders find it useful to fold these checks directly into existing PPAP or process control plan documentation, so that moisture verification and vent inspection frequency are formally specified rather than left to individual operator discretion, particularly on programs involving multiple shifts or contract personnel who may not carry the same tribal knowledge as a long-tenured process team.
Cost and Quality Impact of Silver Streaks
Silver streaking is frequently treated as a purely cosmetic issue, but its cost impact extends well beyond scrap rate on cosmetic-grade parts. For hygroscopic engineering resins like nylon and PC, visible streaking is often accompanying evidence of hydrolytic degradation that has already reduced impact strength, elongation, and long-term fatigue performance — meaning a part that passes a visual inspection standard but was molded from under-dried resin may still carry a latent mechanical property deficit that only surfaces in field use or accelerated life testing.
On cosmetic or Class A surface parts, streaking that would be rejected on visual inspection alone can drive scrap rates into the range of several percent of total production on chronic, unresolved cases — a cost that compounds quickly at production volumes in the hundreds of thousands or millions of parts per year. Because the root cause frequently traces back to a drying system or process setting rather than the mold itself, the corrective cost is often far lower than the accumulated scrap cost of an unaddressed chronic streaking problem, which makes early, systematic diagnosis directly tied to production economics rather than a purely quality-department concern.
There is also a downstream cost dimension that is easy to overlook: rework and secondary operations. Some shops attempt to salvage streaked cosmetic parts through secondary painting, in-mold decoration touch-up, or hot-stamping over the affected area rather than scrapping the part outright. While this can recover parts in the short term, it adds labor and material cost per unit that erodes margin on every affected part, and it does nothing to address any underlying mechanical property loss on hygroscopic resins where the streak is a visible symptom of a deeper hydrolytic degradation issue. Treating the defect at its process root is almost always more economical over a full production run than building a permanent rework step into the routing to compensate for it.
Tip: Don’t Rely on Visual Inspection Alone for Hygroscopic Resins. Because moisture-driven hydrolytic degradation in resins like nylon, PC, and PBT can reduce mechanical properties even at moisture levels too low to produce visible streaking, a visual inspection standard alone is not sufficient quality control for structural or safety-critical components molded from these materials. Pair visual surface inspection with periodic moisture content verification at the hopper and, for critical applications, periodic mechanical property testing — such as notched impact or tensile elongation — on production samples to confirm that process control is holding within the resin’s validated processing window. This is particularly important after any change to drying equipment, resin lot, or ambient shop conditions, since a process that was previously validated can drift out of its safe moisture window without producing an immediately visible cosmetic symptom. Building this verification into a periodic PPAP or process audit cadence, rather than a one-time qualification event, catches drift before it reaches a customer.
Working With Your Molder When Silver Streaking Recurs
When a streaking complaint reaches procurement or product engineering rather than staying inside the molder’s own quality process, it is usually because the defect has recurred despite an earlier fix, or because it appeared on a part that had previously run clean for an extended period. In either case, the questions below help separate a molder that is genuinely investigating root cause from one that is simply adjusting settings until the visible symptom temporarily clears.
- What was the measured moisture content of the resin at the time of the affected production run? A molder with disciplined process control should be able to produce this data rather than assuming the dryer was functioning correctly.
- Has the barrel residence time been checked against the current shot size on this specific machine? This is especially relevant if the tool was recently moved to a different press.
- Was a short-shot fill study performed to confirm vent locations against actual last-fill behavior, or were vents simply cleaned and assumed to be adequate?
- Is the defect isolated to a specific cavity in a multi-cavity tool, and if so, has runner balance been evaluated as a possible cause?
- What corrective action was taken, and is there a plan to verify the fix holds across a full production shift rather than a short qualification run?
A molder that can answer these questions with specific data — moisture readings, fill study photographs, process parameter logs — is demonstrating the kind of systematic diagnostic discipline described throughout this guide, and is far more likely to resolve the issue permanently rather than temporarily. This is also a useful line of questioning to build into a supplier qualification checklist before awarding a program involving hygroscopic engineering resins or cosmetic Class A surfaces, where the cost of a recurring streaking issue discovered after tooling and production ramp-up is significantly higher than catching it during supplier selection.
Frequently Asked Questions
Q1. Can silver streaks be fixed without modifying the mold?
In most cases, yes. The majority of silver streak complaints trace back to resin moisture content or process settings such as back pressure and screw speed, both of which can be corrected without any mold modification. Mold-related causes — inadequate venting or undersized gates — are a smaller share of cases and are typically identified only after material and process causes have been ruled out through an isolation trial.
Q2. How long should resin be dried before molding to prevent silver streaks?
Drying time depends heavily on resin type: nylon typically requires 4–6 hours at 75–85°C, while polycarbonate requires 3–4 hours at 115–125°C to reach a safe moisture content below 0.02%. Always follow the specific resin supplier’s datasheet rather than a generic in-house standard, since drying requirements vary meaningfully even within the same general resin family depending on grade and additive package.
Q3. Why does silver streaking appear intermittently rather than on every shot?
Intermittent streaking is a strong indicator of a borderline condition — resin moisture content that is close to but not always over the safe threshold, or a hopper residence time long enough for partially dried material to reabsorb ambient moisture inconsistently depending on shop humidity. Logging streak occurrences against shift time, humidity, and resin lot number typically reveals the pattern driving the intermittency.
Q4. Does regrind cause silver streaking even if the virgin resin is properly dried?
Yes. Regrind that has been stored without moisture protection, blended above the recommended ratio, or reprocessed multiple times can reintroduce both absorbed moisture and degraded polymer into an otherwise correctly dried virgin material stream. Regrind should be dried to the same moisture specification as virgin resin and tracked separately in any defect investigation.
Q5. Is silver streaking always related to moisture?
No. While moisture vapor is the most common cause, particularly in hygroscopic engineering resins, entrapped air from inadequate mold venting and volatilizing additives can also produce a visually similar streaked appearance, especially in non-hygroscopic resins like polypropylene and polyethylene where moisture-driven streaking is inherently less likely.
Q6. What moisture content is considered safe for nylon before molding?
Most nylon grades should be dried to below 0.15% moisture content by weight before molding, with some high-performance or glass-filled grades requiring even tighter control per the specific resin supplier’s datasheet. Moisture content should be verified with a handheld moisture analyzer rather than assumed from drying time alone, since dryer performance can vary with load size and ambient conditions.
Q7. Can increasing barrel temperature fix silver streaking?
Generally no, and it frequently makes the defect worse. Increasing barrel temperature does not remove moisture that is already absorbed into the resin pellets; it simply causes that moisture to flash into steam more aggressively, along with increasing the risk of thermal degradation and additional volatile gas generation, particularly at the nozzle and front zones.
Q8. How do I know if the problem is venting rather than moisture?
Run an isolation trial using freshly and correctly dried virgin resin, at the resin supplier’s recommended process settings. If streaking still occurs under these controlled conditions, the cause is most likely mold venting, gate design, or entrapped air rather than material moisture, and a short-shot fill study should be performed next to map the true last-fill and air-trap locations on the cavity.